Showing posts with label Tutorial. Show all posts

Tuesday, December 18, 2012

Cara Mengakses Situs yang Diblokir

HighTech IT Solution | Best IT Solution. Maraknya situs-situs berbahaya mengandung unsur SARA dan Pornografi provider maupun ISP yang mungkin anda pakai saat ini bekerja sama dengan Depkominfo masih terus menggalakan Internet Posifit Indonesia. "Setinggi tingginya tupai meloncat, pasti akan jatuh juga", mungkin peribahasa ini sangat cocok untuk kasus kita kali ini.
Untuk dapat mengakses situs-situs yang terblokir tersebut yang sekiranya memang tidak mengandung unsur-unsur diatas tentu sangat merugikan pengguna Internet. Nah oleh karena itu, kali ini admin akan sharing beberapa trik untuk dapat mengakses situs terblokir tersebut.

========================================================
Yang pertama, kita bisa menggunakan alamat IP address dari website yang akan kita akses.
  • Pencet tombol Windows (di apit tombol Ctrl dan Alt) bersamaan dengan huruf R yang akan membuka  windows Run.
  • Kemudian ketikkan ping(spasi)"nama website" (tanpa tanda kutip)(spasi) -t
  • Muncul command line yang akan menampilkan IP address beserta keterangan lainnya.
Lihat Gambar:
========================================================
Yang kedua, menggunakan settingan PROXY pastinya gunakanya yang Free saja. Berikut cara setting proxy menggunakan browser Mozilla Firefox dan Google Chrome.

1. Mozilla Firefox

  • Pilih menu Options / Tools -> Options
  • Cari Tab Advance -> Netword
  • Pada bagian Connection klik Settings
  • Pilih Manual Proxy
  • Masukkan alamat IP proxy yang sudah anda siapkan sebelumnya berserta port yang digunakan.
Judul Spoiler:
2. Google Chrome


  • Buka browser Google Chrome anda, klik menu Customize and control Google Chrome di bagian kanan atas, kemudian pilih sub menu Settings.
  • Scroll ke bawah sampai anda menemukan tulisan biru Show Advance Settings..., kemudian klik, scroll lagi ke bawah sampai menemukan bagian Network. Kemudian tekan tombol Change proxy settings... Pilih Tab Connections.
  • Pada bagian Dial-up and Virtual Private Network settings pilih koneksi internet yang anda pakai, lalu tekan tombol LAN Settings yang ada di sebelah kanan bawah kolom tersebut.
  • Muncul window baru lagi, di sana centang pada pilihan Use a proxy server to this connection (bla bla bla)
  • Isikan IP address yang anda telah siapkan sebelumnya pada kotak Address: berserta dengan Port yang digunakan pada kotak Port: kemudian klik OK
  • Selamat berinternet. (Be Smart!)
Jika kurang jelas lihat gambar di bawah ini.


========================================================
Yang ketiga, kita juga bisa menggunakan VPN (virtual private network)

- Kali ini admin akan share menggunakan FreeCanadaVPN (lebih lanjut...)
- Untuk cara settingnya bisa baca sendiri di sini (untuk Windows 7) dan klik di sini (untuk Windows XP), sekalian belajar nerjemahin bahasa Inggris yak... :p mudah kog. :)
========================================================
Yang keempat, bisa juga menggunakan software basic nya sama sih pake VPN juga. 
(Recomended from Admin).
- Nama softwarenya adalah Spotflux
- Skema kerja Spotflux :


Tested on Win 7 Ultimate

File + Link yang dibutuhkan:
- Spotflux: Download

Jangan lupa tinggalkan komentar dan Like-nya yah. ^.^

Friday, December 7, 2012

Menambahkan Desktop Gadget di Windows 8

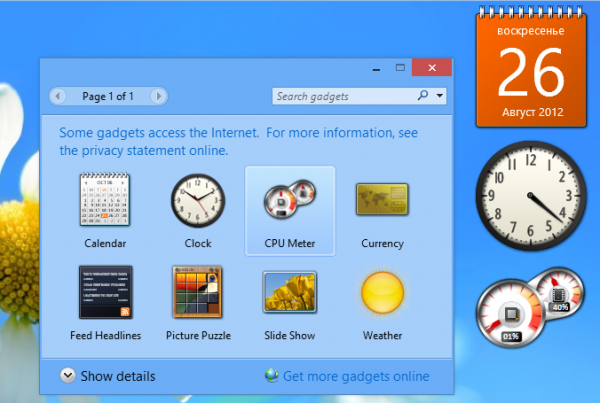
HighTech IT Solution | Best IT Solution. Bagi pemakai Windows 8 khususnya Windows 8 RTM, anda pasti merasa ada yang kurang di bagian Desktop Windows 8 anda. Yap..gadget yang biasanya ada seperti Clock,  CPU Meter, Weather, dll seperti halnya di windows vista dan windows 7. Nah, kali ini saya akan coba sharing untuk menampilkan kembali gadget tersebut di windows 8 anda khususnya versi RTM.


Trik ini saya dapat dari orang luar yang membuat suatu perubahan pada system Windows 8 sehingga dapat menampilkan kembali gadget pada desktop Windows 8 anda. WinAero merupakan website yang menyediakan beberapa software mini tools yang sangat bermanfaat bagi para pengguna operating system Windows terlebih diberikan secara gratis alias FREE. Langsung saja admin berikan solusinya.

Step 1
  - Download file Windows 8 Desktop Gadget di sini.

Step 2
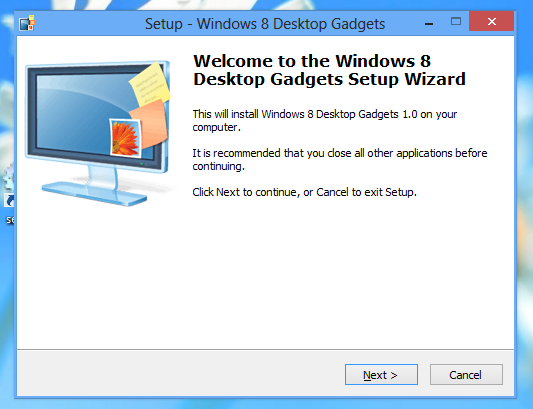
  - Jalankan installer yang telah anda download dari link di atas.


 - Ikuti langkah-langkahnya hingga selesai

Step 3
 - Setelah proses installasi selesai klik kanan pada desktop anda, maka anda akan melihat konteks menu yang bertuliskan "Gadgets" klik menu tersebut. 


 - Kemudian pilih gadget mana yang akan anda tampilkan.

Step 4
- Enjoy!!

Source: WinAero

Monday, December 3, 2012

How to Expand Short URL from Adf.ly

HighTech IT Solution | Best IT Solution. Halo sobat HighTech, pada postingan kali ini admin mau bahas soal adf.ly. Para pengguna internet pastinya tau donk apa sih Adf.ly ituAdf.ly merupakan website URL Shortener yang sangat populer dikalangan pencari uang lewat internet. Website ini memberikan sebuah pelayanan untuk membuat link anda menjadi singkat sehingga enak untuk dilihat jika dipasangkan diwebsite maupun blog sobat. URL Shortener yang satu ini masih tetap digunakan oleh kebanyakan orang karena monetisasi link dan terbukti membayar.

Namun terkadang kalian yang membutuhkan isi dari short url tersebut merasa tidak nyaman dengan munculnya halaman iklan maupun menunggu munculnya tulisan "Skip ad". (*Admin juga merasakan hal yang sama*). Nah maka dari itu, kali ini admin akan share "Bagaimana cara melewati halaman iklan Adf.ly ?"
Simple saja sih...ini merupakan sebuah script yang telah dibuat oleh seseorang di luar sana *sotoy dikit* namun telah banyak diupload ke website-website. Langsung saja menuju ke TKP sob....

Preview:


 Cara menggunakan:
- Siapkan link Adf.ly yang akan anda gunakan.
- Buka web ini => click here. --> Update link : di sini
- Copy dan Paste-kan ke kotak putih seperti gambar di atas.
- Klik tombol "Expand URL"
- Maka akan muncul link asli di bawahnya. (lihat gambar di bawah)


Nah sekian artikel dari admin yang bisa saya bagikan, semoga bermanfaat bagi sobat HighTech. Eitss...jangan lupa klik tombol Like atau Share nya yah sob.


Cara Download Files dari Suspended Account Mediafire

HighTech IT Solution | Best IT Solution. Banyaknya media sharing dan penyimpanan file secara online pastinya membuat pusing kita untuk memilih file hosting mana yang mudah dan nyaman bagi setiap orang yang mau berbagi maupun yang mendownloadnya. Mediafire.com merupakan salah satu file hosting yang cukup terkenal di kalangan pencari file gratisan. Namun, semenjak munculnya permasalahan hukum terkait hak milik (copyright) FBI pun bertindak tegas terhadap file hosting yang ikut menyebarkan file-file yang mempunyai hak milik. Oleh sebab itu, tak jarang kita sering mendapati file yang akan kita download mengalami "File Blocked For Violation" atau "File Belongs to Suspended Account", nah sobat HighTech kali ini admin akan berbagi cara mendownload file yang mengalami 2 hal tersebut di atas. "Bagaimana bisa??"

Oke langsung saja...berikut tutorial untuk mendownload file blocked for violation or suspended account dari Mediafire

Step 1
  Siapkan link file yang akan didownload karena account suspended or file blocked bukan file deleted yah sob!


Step 2
  Buka link Tuxgeek ini.

Step 3
  Pilih Tab "Download suspended files"

Step 4
  Input link mediafire (link suspended) yang ingin di download ke kotak yang sudah di sediakan, kemudian klik "Generate New Link"

Step 5
  Setelah proses loading akan muncul link mediafire baru, klik kanan link tersebut pilih "Copy Link Location"

Step 6
  Masuk ke Tab "Generate download link", paste link yang sudah di copy tadi ke kotak yang disediakan.

Step 7
  Copy sharing code berikut 7e5e03b8e9035daa018f5cbc5a3938e6f1bc2f2f ke kotak "If files are private , enter the sharing code :" --> Code ini tetap sob untuk mendownload file yang bersifat private.


Step 8 
  klik "Generate" nanti akan muncul captcha di bawah -> isi sesuai dengan kode captcha yang ada -> Send captcha -> muncul Link yang siap di download.


Step 9
  Enjoy the new link!! ^_^

Video Tutorial
  Tutorial download file blocked or suspended account Mediafire.


Edit: nambahin video tutorial
Source: Indowebster

Monday, November 26, 2012

How to Convert SWF File to GIF format?

HighTech IT Solution | How to Convert SWF File to GIF format? Magic Swf2ZGif is the right answer. Magic Swf2Gif is a powerful utility that uniquely supports to convert Macromedia Flash SWF to animated GIF. With Magic Swf2Gif, a gif file in any resolution and any frame rate can be output from swf file, so that you can create GIF animation using FLASH MX and SWish.


Main functions:

  • Convert Flash to Gif
  • Convert Flash to TGA sequences
  • Convert Flash to BMP sequences
Other Features:
  • Batch conversion for Swf to Gif.
  • Automatically optimize the size of generated Gif.
  • Convert to BMP and TGA images sequence.
  • Capture a frame to a bmp file.
  • Provide seek controller that help to fast locate frame number range for conversion.
  • Support Flash 6 compressed movie.
  • No skip frames during conversion.
  • Customizable dimensions for exported video .
  • Customizable frame rate for exported video .
  • User specifies the start and end frame number to convert.
  • Easy to use.
Screenshoot:


Download:
Mediafire | pass: hightech

Thursday, November 22, 2012

How to Remove Restrictions from PDF Files Protected

HighTech IT Solution | With SysTools PDF Unlocker you can successfully remove PDF file security levels and get the ability of editing, printing, copying or extracting the data of the PDF file that was once protected with local security.


Trial Version Limitation

SysTools PDF Unlocker comes with a trial version that allows the users to preview software abilities and functionalities prior to purchase. A demo PDF file provided with the free of cost demo version is to be used for testing the software and the only restriction is that after unlocking the demo PDF, the tool will watermark the respective file with “SysTools” as part of the demonstration process.


Full Version for Comprehensive Results

With the full version of the software you can carry out the unlocking of unlimited number of PDF files of your own at a reasonable price range, with absolute ease and no restrictions enforced on you.

List Of Features That PDF Unlocker Exhibits

  • Security Removal
    Using the software will help you to remove the entire security assigned on the PDF file data which will let you toedit, copy, extract and print the information stored in the respective PDF file easily.
  • Password Removal With Data Security
    Users can remove owner level of password protection from their PDF file with the help of this application program which completely ensures the safety of data while doing so.
  • Extensive Support
    The application is built to render complete support to all the versions of Adobe Acrobat as well as Windows operating systems for unlocking PDF files so that a wide variety of users can get to use the tool.
  • Standalone Application
    This superb PDF Unlocker application is also a standalone tool i.e. it can function smoothly even without the installation of Adobe Acrobat on the respective operating system on which the unlocking procedure will be carried out.
  • Easy User Interface
    The operational interface of SysTools PDF Unlocker is built with a user friendly Graphical User Interface that helps all types of users to operate the software with sheer effortlessness and understandability of software functioning.


System Requirements

Support Microsoft Windows 2000, 2003, 2008, XP, Vista, or Windows 7 (32-bit or 64-bit)
Support Adobe Acrobat 1.0, 2.0, 3.0, 4.0, 5.0, 6.0, 7.0, 8.0, 9.0 and Adobe Acrobat 10.0
1 GHz processor (2.4 GHz is recommended)
RAM: 256 MB of RAM (512 MB is recommended)
5 MB of free hard disk space


How to Use?
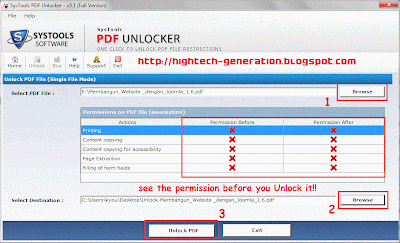
1. Open the Application. 


2. Choose PDF files you are going to use.
3. Select output destination to save the Unlocked PDF file you choose before.
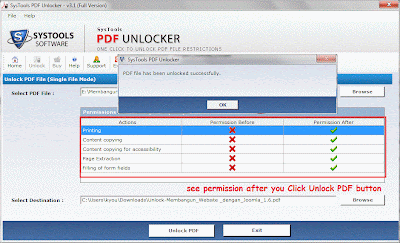
4. Click Unlock PDF button (number 3 on picture below)


5. Voila! Your Locked PDF now is Unlock


Link Download:
Mediafire | pass: hightech
Don't forget to Like and Share ^_^

Wednesday, November 7, 2012

Repairing Corrupted Microsoft Word 2003 & 2007 Files

HighTech IT Solution. John: I got assignment last night, It's about my ms word 2007 files. It can't opened. I don't know Why?? What happen with my files?? Hmm...I remember something, last night rain dropped very hard, then suddenly electricity in my house turned off. I think my files was corrupted while it happened. Can you fix my corrupted files, brother?

Me: "Fortunately for you all hope is not lost. Normally, when Word 2007 detects a corrupt file, it will automatically try and repair it while it is opening the file. You can also force this behavior by taking the following steps:

  1. In Word 2007, click the Office button and select Open.
  2. In the Open dialog box, click on the corrupt file that you would like to open and then click the small down arrow next to the Open button. This will bring up the Open menu.
  3. In the Open menu, select "Open and Repair."
With Word 2003, a similar feature existed. When "Open and Repair" failed to resuscitate a corrupt Word .doc file.
But, don't worry I got tool for repair your ms word 2003 file. You can use "Repair My Word".
Repair My Word is a data recovery program for Microsoft Word documents. It is designed to recover text from damaged or corrupt Word files (.doc files) that will not open normally. The recovered text can then be saved as an error free Microsoft Word document.
This program does NOT work for Office 2007 .docx files.
Some common error messages which can prevent a user opening a Microsoft Word document include:
  • "The document name or path is not valid. Try these suggestions. Check the file permissions for the document or drive. Use the File Open dialog box to locate the document."
  • "Word cannot open the document."
  • "Word cannot open the document: user does not have access privileges."
  • When you attempt to open a Microsoft Word 97 document into Microsoft Word version 6.x or 7.x, the document contains garbage characters.
Repair My Word will allow you to obtain access to the contents of corrupt word documents. It will repair Microsoft Word 6.0, Word 95, 97, 2000, XP, and 2003 for Windows.
Repair My Word is simple to use. Just open the corrupt Word file, preview the recoverable text in the preview window and save this text to a new error free Word file.

Finally, one other approach is to convert the .docx file to a .doc file using an online converter, and I have found the online Docx converter to work really well. Convert your .docx files into .doc using this site.

Alternative software for repair your word files you can also use this Stellar Phoenix Recovery Word.

Features – Stellar Phoenix Word Repair Software

Stellar Phoenix Word Recovery is one of the reliable MS Word file recovery software with many advanced Word repair features which make it unique among other products. Below mentioned are the key features of this powerful Word recovery tool:

Word Documents & File RecoveryWord Documents & File Recovery

The Word recovery software safely repairs corrupt Word files with their original text, font, pictures, and headers/footers intact. The Word repair tool is helpful when your MS Word document becomes inaccessible, starts repagination automatically, or suddenly increases its size when it gets corrupt.

Recovers Charts and Pictures and ImagesRecovers Charts, Pictures, Images

The doc recovery software can now recover all the Charts, images, and pictures inserted to the Word file in their original resolution and size.


Log File GenerationLog File Generation

The software provides you the option to save the log file which is generated after the recovery process. The Log Report contains the details of the process, such as name of the corrupt Word file, beginning and end of the process, etc.

Advance RepairAdvance Repair

If your MS Word file is severely corrupt and is not repaired by simple repair option or the repaired result is unsatisfactory, then opt for 'Advance Repair' option. This option works only for .doc files.

User-Friendly GUIUser-Friendly GUI

The software has improved, very intuitive, and user friendly graphical interface which guides you throughout the recovery process. This makes the software very easy to use for any user to use and recover corrupt Word document.

Raw RecoveryRaw Recovery

'Raw Recovery' is one very useful option for the users who have very severely corrupt files. This option recovers all the text found in the damaged Word file and the recovered data comes in raw text form.

Searches for Word FileSearches for Word File

The software searches your Word file with .doc and .docx extensions in the entire hard drive, volume, or a folder of your Windows based computer. This is one of the powerful option of the software that you can use to find the MS Word file, if its location is unknown or forgotten. To help you to identify your required Word document the search result shows files with their name, size, creation date, and last modification date.


Monday, November 5, 2012

Cara membuka MMS Indosat dan XL secara Online

HighTech IT Solution Sebenarnya trik ini sudah lama sekali, tapi apa salahnya dibagikan lagi kepada teman-teman yang mungkin belum tahu "Bagaimana membuka MMS Indosat secara Online?", so bagi sobat yang Hp nya belum bisa menggunakan fasilitas MMS bisa langsung dipraktekan trik ini.

Step 1: Buka browser yang ada (Firefox, Google Chrome, Safari, dll)
Step 2: Ketikkan http://202.93.36.12/mms/ atau https://mms.indosat.com/mms/ pada address bar di browser anda.
Step 3: Maka sobat akan melihat tampilan website seperti gambar di bawah ini.
Step 4: Masukkan Message ID yang anda peroleh via SMS pada handphone sobat.

Step 5: Submit
Step 6: Keluar tampilan seperti gambar di bawah. (Pilihan 1 jika browser anda support dengan JAVA, Pilihan 2 jika browser anda tidak support dengan JAVA), jika hanya sekedar gambar saya lebih suka memakai pilihan nomor 2.


Untuk operator XL bisa kunjungi website http://mmc.xl.net.id:30025/tgw/public/logon.html, kira-kira tampilan websitenya akan seperti ini:


                                  Semoga bermanfaat bagi kita semua.


Saturday, October 20, 2012

Cara Mengganti SMS Tone pada iPhone

Bosan dengan nada dering sms iphone anda hanya itu-itu aja? Okelah, saya akan mencoba share trik mengganti nada dering sms pada iphone. Langsung saja simak tutorial di bawah ini.


Cara Pertama
  1. Masuk ke directory iphone anda melalui ssh di pc
  2. Masuk ke system/library/audio/uisounds
  3. Setelah masuk copy semua sms-received1-6.caf ke pc anda (untuk jaga2)
  4. Lalu copy paste tone yg td anda sudah siapkan ke directory tersebut.
  5. Lalu rename tone yg anda punya menjadi sms-received1.caf or sms-received2.caf - 6 (pilih aja diantara sms tone original iphone mana yg anda mau ganti antara 1-6)
  6. Reboot iphone anda
  7. Masuk ke setting -> sounds -> new text message.
  8. Pilih tone sms anda, jika anda merubah sms-received1.caf maka yg paling atas yg berubah.
  9. Selesai
Cara Kedua
Bagian 1 
Cara ke-2 ini menggunakan winterboard untuk merubah nya
  1. Pastikan iphone dalam keadaan terjailbrake
  2. Pastikan anda sudah menginstal Winterboard dr cydia.
  3. Pastikan anda sudah mengistal openSSH dr cydia jika ingin via wifi.
  4. Pastikan anda sudah menginstal afc2add dr cydia jika ingin via usb.
  5. Pastikan anda punya minimal 3 tone -+ 6 detik berformat .caf (1 juga gpp, 3 biar gampang aja jadi nya ga perlu bulak balik lagi )
Bagian 2 
Buat Folder baru di pc anda dan dikasih nama bebas contoh folder "A"
  1. Di dalam folder tersebut buat folder lagi kemudian kasih nama UISounds
  2. Rename tone 1 yg anda punya menjadi sms-received1.caf
  3. Rename tone 2 yg anda punya menjadi sms-received2.caf (jika ada beberapa tone).
  4. Rename tone 3 yg anda punya menjadi sms-received3.caf (jika ada beberapa tone).
  5. Copy semua tone yg tadi sudah di rename ke dalam folder UISounds.
  6. Copy folder "A" kedalam iphone melalui ssh di pc.
  7. Copy kedalam directory var-stash-themes.xxxx (di iphone).
  8. Sesudah di copy, masuk ke dalam winterboard di iphone.
  9. Pastikan nama "A" (nama bebas, sesuai yg td anda kasih) didalam Winterboard anda centang.
  10. Respring iphone.
  11. Masuk ke setting -sounds-new text message.
  12. Pilih tone anda, jika anda tadi membuat 3 tone maka yg berubah di setting itu adalah Tri-tone, Chime, Glass. jika hanya satu maka yg berubah hanya Tri-tone saja.
  13. Selesai
Nb: jangan lupa untuk membackup data2 yang akan anda rubah, pastikan langkah-langkah di atas di jalankan sesuai urutan. Resiko yang terjadi ditanggung sendiri ya. :p

Friday, October 12, 2012

Cara Mengatasi Fake Serial Number Pada IDM

Para pengguna Internet Download Manager pernah atau sedang mengalami hal seperti gambar di bawah ini?? Fake serial number?!! OMG!


Untuk para pecinta IDM Manager jangan bingung dengan masalah tersebut mari kita atasi secara bersama-sama bagaimana cara untuk mengatasinya.

Step by step cara mengatasinya:
  1. Sebelumnya Uninstall dulu IDM nya
  2. Download IDM 6.12 + Patch di sini
  3. Install IDM 6.12 (internet harus dalam keadaan disconnect) setelah di Install
  4. Close IDM nya, termasuk yang di system tray icon (kanan bawah dekstop)
  5. Sekarang msuk ke Run. caranya klik Start >> Run, di kolom open ketik regedit,klik Ok, kemudian cari HKEY_LOCAL_MACHINE >> SOFTWARE  >> Internet Download Manager, lalu hapus yang Internet Download Manager.
  6. Copy file "Patch IDM" yang tadi telah anda download kedalam directory Folder instalasi IDM nya, misal anda menginstal IDM di directory C:\Program Files\Internet Download Manager (Paste disini patch nya ).
  7. Sekarang tinggal jalanin deh Patch nya, Masukan First name dan Last name terserah anda kemudian Klik OK, jika berhasil maka akan muncul tulisan "successfully patched" pada patch tersebut. (disable dulu antivirusnya, karena Patch akan di kenal sebagai virus oleh AV).
  8. Selesai.
Saya sertakan beberapa Serial Number untuk IDM versi 6.XX:
S/N: TO66A-MP9EY-8PO85-38P3CS/N: XGMVR-7DU10-TX25N-Q312CS/N: 3UO5L-8DKV1-FGOWX-VMS54S/N: 51CK5-FTX50-EQ2JY-H7RFY
Semoga bermanfaat.
Don't forget to comment and share.
^_^

Wednesday, October 10, 2012

Cara Menampilkan Folder Hidden dan Super Hidden

Penasaran ama yang namanya trik trik dalam dunia komputer, tidak sengaja saya menemukan masalah, walaupun sebenanya sudah banyak tools yang bertebaran di dunia cyber ini. Namun ada cara yang lebih simple kenapa tidak dicoba? dan kita tidak perlu repot menginstall aplikasi ini itu banyak sekali..hahaha.. :D

Langsung saja praktek sob..
  • Buka CMD(command prompt)
  • Lalu masuk ke drive yang ingin di unhide ,drive yang ingin saya unhide adalah C: lalu kita ketikkan C: di cmd
  • Lalu kita ketikkan perintah berikut : ATTRIB -R -A -S -H  /S /D
  • Tunggu sampai kembali ke direktori G: dan proses unhide SUPERHIDDEN folder telah selesai.
Mudah kan? Bisa diterapkan di komputer / laptop teman anda yang suka ngumpetin file terlarang.... :p

Semoga bermanfaat sob.

Don't forget to comment and share.
Thankz.

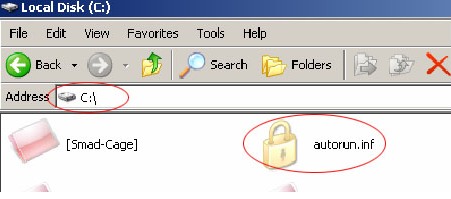
Cara Menghapus Folder Autorun.inf dari Smadav

Nah bagi teman-teman yang ingin menghapus folder autorun.inf ini tidak usah repot harus men-donwload aplikasi autorun remover, kita bisa bikin sendiri.


Caranya,
Buka notepad, kemudian ketik:

rd /s /q autorun.inf\con\aux\

rd /s /q autorun.inf\con\

rd /s /q autorun.inf\

Simpan file tersebut dengan ekstensi batch file (contoh autorun_remover.bat), kemudian close notepad.

Jika ingin menghapus folder autorun.inf, copy-kan file autorun_remover.bat ke direktori yang sama dengan folder autorun berada. Trus double klik file tersebut, tunggu beberapa detik dan hasilnya folder autorun.inf akan terhapus.

Thx to Moch. Zawaruddin Abdullah

Saturday, October 6, 2012

Cara Mengatasi Windows 7 Tidak Bisa Shutdown


Windows 7 Tidak Bisa Shut Down? Beberapa pengguna mengalami masalah Windows 7 tidak bisa shutdown atau Windows 7 hang ketika shutdown, baik dengan atau tanpa pesan kesalahan. Ini pertanyaan tidak mudah dijawab, karena penyebabnya juga sangat beragam. Beberapa berhasil mengatasi dengan cara yang satu dan yang lain berhasil dengan tips yang lain pula.
Di bawah ini saya akan mengulas sedikit mengapa komputer tidak bisa shutdown dalam berbagai kasus. Namun satu yang saya garis bawahi bahwa jika komputer tidak bisa shutdown harus dipisahkan dari Blue Screen Of Death. Sebab jika komputer anda tidak bisa dimatikan karena BSOD, maka penanganannya akan berbeda.
Kasus tidak bisa shutdown ini sudah warisan dari Windows 2000, XP dan sampai pada Windows 7 juga. Dari sekian banyak penyebab windows tidak bisa shutdown, saya simpulkan penyebabnya seperti dibawah ini;
  1. Karena masih ada program yang berjalan di belakang layar (misalnya antivirus)
  2. Masalah update/upgrade windows 7 yang tidak sempurnah
  3. Masalah driver perangkat
  4.  File windows corupt
  5. masalah hardware
  6. menginstall perangkat lunak pihak ketiga
Untuk memastikan yang mana penyebabnya juga bukan pekerjaan mudah. Dalam banyak kasus, tidak ada pesan apa-apa tetapi yang nyata adalah windows mogok shutdown. Hanya user yang bisa menduga-duga misalnya ketika selesai update driver dan ini terjadi maka berarti kemungkinan penyebabnya adalah driver. Di bawah ini saya berika beberapa pilihan untuk mengatasi hal tersebut.
Catatan :
  1. Harap dicatat bahwa jika langkah satu berhasil jangan lagi lanjutkan ke langkah dua dan seterusnya.
  2. Jika langkah satu anda terapkan dan tidak berhasil maka silahkan kembalikan perubahan yang anda buat.
SOLUSI # 1
  1. Tekan tombol [Start]  dan lakukan seperti yang biasanya Anda lakukan untuk mematikan komputer, dan ketika itu tidak merespon Anda perlu menekan tombol CTRL + ALT + DEL, kemudian masuk ke Task Manager.
  2. Di dalam jendela Task Manager akan melihat semua proses yang berjalan. Jika tidak, klik tab [Processes] untuk menampilkannya.
  3. Setelah Anda berada di area Proses, lihat setiap proses yang masih menunjukkan aktivitas. Klik setidaknya 2-4 proses yang sedang berjalan dan klik [End Process]. Setelah Anda telah mengakhiri setidaknya 2-4 proses tadi, kembali ke tombol start dan coba untuk log off lagi. Biarkan Task Manager tetap berjalan agar anda bisa langsung lanjutkan jika tidak berhasil.
  4. Jika komputer Anda masih tidak log off atau tidak mau restart, ulangi langkah no # 3. Kali ini, hentikan beberapa proses yang menunjukkan tidak ada aktifitas di dalamnya. Setidaknya 3  proses lagi. Lalu tes lagi. Semoga berhasil.
PENTING!!! : Ada beberapa proses yang tidak boleh anda hentikan dan jangan main-main dengan proses ini. Mereka tidak akan membahayakan komputer Anda sama sekali, tetapi Anda akan membuat prosedur lebih sulit pada diri sendiri. Proses-proses yang tidak boleh anda hentikan adalah:
  • System Idle Process  Jika Anda membunuh satu ini, Anda mungkin juga menekan tombol ini akan membuat semua proses berhenti. Jadi anda harus mereset kembali.
  • explorer.exe  Ini akan menutup taskbar di bagian bawah komputer Anda dan jika anda tutup, Anda akan punya tombol sama sekali.
  • Sebaiknya juga jangan menghentikan taskmgr.exe

Ingat, berhati-hati untuk TIDAK mematikan komputer Anda dengan menekan tombol power Anda.
SOLUSI # 2
  1. Masuk pergi msconfig, tekan [Start] lalu ketik msconfig dan kemudian [Enter]
  2. Dari jendela [System Configuration] cobalah  pilih tab [Start Up] dan nonaktifkan layanan yang tidak penting pada boot berikutnya. Lihat gambar dibawah lalu coba restart!
SOLUSI # 3
Pada windows 7 yang menggunakan theme Aero, masalah ini juga pernah terjadi dan diatasi dengan me-nonaktifka windows Aero dan mengganti dengan Classic.
SOLUSI # 4
Periksa driver kartu grafis melalui [Device Manager] dan lihat apakah kartu grafis normal dan tidak ada tanda bahaya (tanda seru “!” berwarna kuning).  Jika ada masalah cobalah  unistall dan insatlling lagi.
SOLUSI # 5
Saya pernah menemukan pada PC Desktop yaitu pengaturan pada BIOS yang tidak diterima oleh komputer. Setelah setting ke [Default] masalah teratasi.
SOLUSI # 6
Jika anda ingat beberapa saat sebelumnya anda menginstall salah satu software dan setelah itu masalah ini mulai terjadi coba uninstall perangkat lunak ataukah driver tersebut kemudian restart. Untuk melakukan ini, klik tombol Start kemudian arahkan ke [Control Panel]-> [System]-> [Device Manager]. Klik kanan perangkat yang anda install drivernya dan pilih [Uninstall] dan setelah itu kemudian restart komputer.
SOLUSI # 7
Jika beberapa tips di atas tidak jalan, maka saatnya kini untuk siap-siap Install Repair. Jika Install Repair juga tidak bekerja berarti Install Total

SOLUSI ALTERNATIF
Tekan tombol Windows + R -> ketik cmd -> ketik shutdown /s /f


Source: blogs sobat agussale.com